The 200" Hale Telescope on Mt. Palomar

Post requests, images, descriptions and reports about work in progress here.
Avatar
Topic author
selden
Developer
Posts: 10190
Joined: 04.09.2002
With us: 22 years
Location: NY, USA

Post #21by selden » 22.12.2007, 22:53

V2 of the Hale Telescope Addon is now available.

It requires Celestia v1.5.0 pre4 or later.

http://www.lepp.cornell.edu/~seb/celest ... ope_v2.zip
(10.4MB, expands to 51MB).

[edit]
Sorry: I forgot to mention the new features. which are why v2 is so much larger than v1.

0. The resolution of the model is significantly increased.

1. The Hale Telescope model points toward whatever object is selected.

2. Manual control of various components of the telescope and of the observatory is available.

3. 3D labels of many of the telescope's parts can be turned on and off.

4. It demonstrates the improvement in resolution provided by the adaptive optics.

5. It shows the paths taken by light in the 5 different observation configurations (only 3 of which are still used).

I've probably forgotten something... ;)

[/edit]
Selden

Avatar
Topic author
selden
Developer
Posts: 10190
Joined: 04.09.2002
With us: 22 years
Location: NY, USA

Post #22by selden » 31.12.2007, 01:15

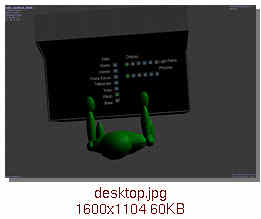
A teaser for the next version:

I'm starting to implement the telescope's control desk.
It's no longer in use for the real telescope since everything is computer controlled, but I thought it'd be fun to simulate it in Celestia.

This shows a trial version, implementing buttons for some of the features of the Addon that are unavailable in real life :)

Image
.
Clicking on one of the buttons in the vertical column hides the specified element of the model. The horizontal rows of buttons implement "radio buttons" -- when one is selected (and lights up green), the others in that row turn off (lighting up blue). They're all 3D: they go down when they turn on and pop back up when turned off.
Selden

buggs_moran
Posts: 835
Joined: 27.09.2004
With us: 20 years
Location: Massachusetts, USA

Post #23by buggs_moran » 31.12.2007, 02:28

selden wrote:They're all 3D: they go down when they turn on and pop back up when turned off.


My goodness...
Homebrew:
WinXP Pro SP2
Asus A7N8X-E Deluxe
AMD Athlon XP 3000/333 2.16 GHz
1 GB Crucial RAM
80 GB WD SATA drive
ATI AIW 9600XT 128M

ElChristou
Developer
Posts: 3776
Joined: 04.02.2005
With us: 19 years 7 months

Post #24by ElChristou » 31.12.2007, 10:14

selden wrote:...They're all 3D: they go down when they turn on and pop back up when turned off.


8O... no words...
Image

Derek
Posts: 64
Joined: 18.12.2007
With us: 16 years 9 months
Location: Pretoria South Africa

The 200" Hale Telescope on Mt. Palomar

Post #25by Derek » 01.01.2008, 10:40

Absolutely incredible

Thanks Selden
Derek

Avatar
Topic author
selden
Developer
Posts: 10190
Joined: 04.09.2002
With us: 22 years
Location: NY, USA

Post #26by selden » 15.01.2008, 13:21

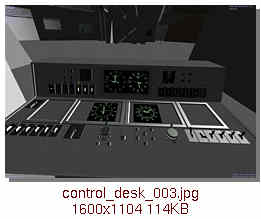
Another teaser for the next version:

This shows an early version of the official control desk. (The previous one controls the Addon's demo features.)

Image
.
Clicking on the switches' labels move the switches and control the telescope.
Selden

Avatar
Hungry4info
Posts: 1133
Joined: 11.09.2005
With us: 19 years
Location: Indiana, United States

Post #27by Hungry4info » 15.01.2008, 14:05

Selden... I admire you...
Very nice work! Seriously!
Current Setup:
Windows 7 64 bit. Celestia 1.6.0.
AMD Athlon Processor, 1.6 Ghz, 3 Gb RAM
ATI Radeon HD 3200 Graphics

Avatar
Topic author
selden
Developer
Posts: 10190
Joined: 04.09.2002
With us: 22 years
Location: NY, USA

Re: The 200" Hale Telescope on Mt. Palomar

Post #28by selden » 12.04.2008, 10:53

In case anyone might be interested....

More to play with blogging than anything else, I'll occasionally put some updates on the progress of the next version of the Hale Telescope Addon at
http://celestiaguru.blogspot.com/
Selden

ElChristou
Developer
Posts: 3776
Joined: 04.02.2005
With us: 19 years 7 months

Re:

Post #29by ElChristou » 12.04.2008, 11:06

selden wrote:Another teaser for the next version:

This shows an early version of the official control desk...

Huh... I miss this! Nice!!
Image

Stuffer
Posts: 67
Joined: 03.12.2008
With us: 15 years 9 months
Location: Stuttgart, Germany

Re: The 200" Hale Telescope on Mt. Palomar

Post #30by Stuffer » 12.03.2009, 11:07

Selden, great work. I love this controlling of movement in Celestia. I love any animating features ;).

Is something like this also possible as automated feature. Can one control a body movement in Celestia from outside? For example via lua hook script or a scripted function?
For example is there a way to tell the telescope to open the doors when a specific event is happening? Space Shuttle opening a door? A s/c that has to draw aside to not crash into another s/c or space debris?
For example by reading/ controlling from a file or socket?

Thanks
Stuffer
Win XP Pro x Core2Duo 2,1GHz x 2 GB RAM x NVidia Quadro FX 1500 256 MB

Avatar
Topic author
selden
Developer
Posts: 10190
Joined: 04.09.2002
With us: 22 years
Location: NY, USA

Re: The 200" Hale Telescope on Mt. Palomar

Post #31by selden » 12.03.2009, 11:51

Stuffer,

The telescope components are controlled by ScriptedOrbit and ScriptedRotation functions.

Commands are passed to those functions by Selecting an appropriately named DSC object. (It won't stay selected. Whenever it recognizes a command, the command recognition function immediately re-selects the previously selected object.)

You might take a look at the script show_lightpaths.cel
It demonstrates control of the model.
You could write a CelX script to watch for whatever events you want and then invoke appropriate telescope commands.

Most of the movements in the telescope model take 10 seconds to finish, so I wouldn't have to provide "motion has completed" status functions.
Maybe next version.
Selden

Avatar
Joe
Posts: 162
Joined: 29.02.2004
With us: 20 years 7 months
Location: United Kingdom

Re: The 200" Hale Telescope on Mt. Palomar

Post #32by Joe » 08.07.2011, 19:42

A model of the Hale Telescope on a DEM of Palomar Mountain and tracking Tau Ceti is available at
Just wonder how DEM file/data can be used or directly loaded into Celestia? I searched the Forum hoping to find out how to ultilise DEM file in Celestia's add-on, can anybody point me to the right direction for this?
Joe
8O

Avatar
Topic author
selden
Developer
Posts: 10190
Joined: 04.09.2002
With us: 22 years
Location: NY, USA

Re: The 200" Hale Telescope on Mt. Palomar

Post #33by selden » 08.07.2011, 20:29

Unfortunately, Celestia does not have the capability of using DEM data directly.
I used 3DEM to translate the DEM into height data, and wrote my own program to translate the height data into Celestia's CMOD model format. Aligning the bumps with the topo map was a pain -- a lot of trial and error. Mostly error.
Selden

Avatar
Joe
Posts: 162
Joined: 29.02.2004
With us: 20 years 7 months
Location: United Kingdom

Re: The 200" Hale Telescope on Mt. Palomar

Post #34by Joe » 09.07.2011, 15:13

Thanks Selden, that was certainly a very delight confirmation for me as I was using a similar approach to using DEM data in Celestia. What was frustrating is to fix the final CMOD onto the face of a planet. No matter how many trials, always (never even mostly) errors. Is there a better way than CMOD in resolving the trial-and-error approach?
Joe

8O

Avatar
Topic author
selden
Developer
Posts: 10190
Joined: 04.09.2002
With us: 22 years
Location: NY, USA

Re: The 200" Hale Telescope on Mt. Palomar

Post #35by selden » 09.07.2011, 18:34

Joe wrote:Thanks Selden, that was certainly a very delight confirmation for me as I was using a similar approach to using DEM data in Celestia. What was frustrating is to fix the final CMOD onto the face of a planet. No matter how many trials, always (never even mostly) errors. Is there a better way than CMOD in resolving the trial-and-error approach?

I'm not sure what you're tying to say.

The SSC coordinate system declarations available in Celestia v1.6.0 and later can make placement of a model on a planet's surface relatively easy.

If its edges are exactly on north-south and east-west directions, placing a model in the correct position on the surface of a planet, with the correct orientation and size, should require only some relatively straight-forward arithmetic if you know the latitude and longitude of the center of the model (or one of its corners) and its dimensions. (I'm assuming that the model is small relative to the curvature of the Earth's surface. Otherwise there are mapping coordinate system effects that you may need to take into account.)

If you can't be sure of some of these prerequisites, then some way to change and measure an object's position and orientation in real-time is needed, which Celestia doesn't provide. :(

For example, here's the SSC placement code that I used for my VLA model. I split the placement code into two objects because of the way I structured the models. I've added some explanatory comments.

Code: Select all


# SurfaceObjects are "correctly" oriented perpendicular to the local surface of the planet
SurfaceObject "vla-00" "Sol/Earth"
{
# this object is just used for reference, so it doesn't need to be visible
# except while testing
   Class "invisible"

#the actual Radius value doesn't matter, since this object is not visible
# if it's too small, though, the object won't be drawn and objects referencing it won't be drawn, either.
   Radius   0.0125

# specify longitude (+ values are East of the prime meridian),
# latitude, and altitude (in km above sealevel)

    FixedPosition { Planetographic [ -107.6177275  34.0787492  2.124]}
   FixedRotation { }
}

# below is the definition of the pedestal supporting the VLA telescope's yoke

# the Path used in its name doesn't need to include the reference object above
# because that is specified in the Frame declarations.
# This Name and Path determine where this object is listed in Celestia's
# Navigation/Solar System Browser menu

"vla-00-base" "Sol/Earth"
{
   Class "component"   # avoids having to specify Albedo so it doesn't glow

   Mesh "vla-base.cmod"

# The Radius (in km) must enclose this object's mesh so the object will be drawn correctly
# but does not itself determine the size of this object
   Radius   0.0125

# Don't scale the Mesh to Radius. Instead use the model's internal dimensions.
# The object will be placed in Celestia  relative to the center of the Mesh's internal coordinate system.
# In other words, if the object is offset relative to the coordinate system used by the software which created it, it'll be offset relative to the position used by Celestia.
   NormalizeMesh false

# Scale the model's internal dimensions to km.
# The resulting object must be smaller than the Radius specified above.
# Otherwise only parts of it will be drawn from some viewpoints.
   MeshScale 0.000055

# position the Mesh relative to the reference object
   OrbitFrame { BodyFixed { Center "Sol/Earth/vla-00"}}
   FixedPosition [ 0 0 0 ]

# orient the Mesh relative to the reference object
   BodyFrame { BodyFixed { Center "Sol/Earth/vla-00"}}
   FixedRotation {}
}


I hope this helps a little.

(My problem with the Hale telescope's ground surface texture was that topo maps have an arbitrary border and size, making it difficult to determine what values to use to cut out the correct small region corresponding to the mesh. Of course, there's also the issue of needing to know the exact coordinate system that was used for drawing the topo map in order to reproject a section of it correctly onto a slightly differently oriented flat object. I ignored that, since the error should have been relatively small.)
Selden

Avatar
Joe
Posts: 162
Joined: 29.02.2004
With us: 20 years 7 months
Location: United Kingdom

Re: The 200" Hale Telescope on Mt. Palomar

Post #36by Joe » 11.07.2011, 13:15

A big thank U to Selden, I got it done. It needs a lot of fine tuning and patience :)
Joe

8O


Return to “Add-on development”