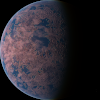
Recently I decided to make a texture for Pollux b (Thestias) and I decided to make it into a tutorial on how to make Gas Giants!
Here we go or something
STEP 1: DOWNLOAD GIMP
We're going to be using a program called GIMP, which is essentially a free version of Photoshop. If you have Photoshop, you can use that as well, but keep in mind that the interface and tools may be different between the two.
Go to https://www.gimp.org/ and download/install GIMP 2.10.
When you open GIMP it should look a little bit like this:
.png (25.88 KiB) Viewed 11111 times")
STEP TWO: BASIC BANDS
Open up GIMP and go to the menu at the top. Go to File > New and create a new document. Make the size 4096 x 2048.
Go to Advanced Options and go down to "Fill With". Change the color to "Transparency". Also change the image/color mode to RGB, if it isn't already set to that. It should look like this:
.png (29.52 KiB) Viewed 11111 times")
Once you've opened your new document, you should pick your gas giant's overall color. To do this go to the two overlapping rectangles on the left side menu. They should be black and white by default. Click on the rectangle in front and change the color to your desired color.
You may have noticed that nothing has happened to your document. To actually fill the document with your color, Change your tool to the Fill tool (The one that looks like a paint bucket) and click on the canvas to fill with your color. I have picked a teal blue as my color.
.png (29.86 KiB) Viewed 11111 times")
Change your brush by changing your tool to the brush tool and clicking on the white square containing the current brush on the left side menu. Ignore what happens on the right side for now. Make sure your Force and Hardness are both at 100 percent. Change your brush to the "Grass" brush, as seen here.
.png (35.97 KiB) Viewed 11111 times")
Added after 12 minutes 14 seconds:
Change your brush color so that it is slightly darker than your main color. Find a good place to place your "band". Go to the left side of where you want your band to be and left-click. Now you've set the starting point of your line/band and made a dot on the left side, like this (circled in red)
_LI.jpg (17.24 KiB) Viewed 11109 times")
No go the the right side, but this time, hold the shift key on your keyboard. You should now see a line in between your starting point on the left and where your mouse is. Go to the right side of the canvas and make sure your line is straight. Then click to create your band. You should now have a band of color running along your canvas.
.png (45.18 KiB) Viewed 11109 times")
Go ahead an make a few more bands, adjusting the lightness however you want. However, I wouldn't recommend changing the hue of your bands. After you are done, it should look a little something like this. Make sure you use the grass brush.
.png (65.88 KiB) Viewed 11109 times")
STEP 3: MAKE IT LOOK LESS LIKE A CRAYON DRAWING
As I just said above, this looks like a 4 year old's crayon drawing. To make it look smoother, go to the top menu and go to Filters > Blue >
Linear Motion Blur. Now, set the length value to around 95, but you can adjust it if you want your bands looking rougher or smoother. To apply click the OK button. It should look a little something like this.
.png (50.04 KiB) Viewed 11109 times")
Added after 20 minutes 38 seconds:
However, doing this means we've created a problem. The left and right edges of the canvas are now a little bit transparent! This is a big problem but it is relatively easy to fix. To fix this, use the Select Tool and select a center portion of your canvas like this:
.png (52.88 KiB) Viewed 11107 times")
Then CTRL-C (Copy) the selection.
Now, go to Layer > Transform > Offset and in the following menu, click the "width/2" button. Then click the Offset button to apply. The transparent regions should now be in the middle.
Create a new layer on top of your background (do this by going to the right side menu and right-click in layers box, and click "New Layer"), and then paste in your center section that you copied earlier by using CTRL-V (Paste) on your top layer (make sure the top layer is selected). It should cover the transparent section quite neatly. To merge the pasted selection onto the top layer, simply use the Select Tool and left-click outside the canvas.
You should now have two layers:
The bottom layer, with your bands and texture,
and your top layer, that has the pasted in section.
If you still have "Floating Selection" on top of your two layers, use the Select Tool and click outside the canvas.
Click on the bottom layer's eyeball button on the right side menu. This will hide the bottom layer, leaving you only with the top layer, which contains the pasted section that hides the transparent areas on the first layer. It should look like this:
.png (38.76 KiB) Viewed 11107 times")
Take your brush, and change the brush back to the default one (one of the blurred circles). Adjust the size to a size you are comfortable with and set the Hardness to 0.
Now erase the left and right edges of the pasted section, leaving you with a blurred edge. This helps to smooth out the transition in betweem the pasted section and the bottom layer. You can do this by using the brush technique that we used to create the bands on our texture, or you can do it by hand. In the end it should look like this:
.png (42.99 KiB) Viewed 11107 times")
Now re-enable the bottom layer by clicking the bottom layer's eyeball button on the right side menu. Now right-click on the top layer and click "Merge Down". Now we've fixed the middle transparent sections.
Added after 22 minutes 39 seconds:
STEP 4: MAKING IT LOOK MORE REALISTIC
Now go to the top menu and go to Filters > Distort > Ripple. Set the Length to the maximum value (1000) and set the amplitude to something like 3. Change the abyss policy to "Loop" and check the box that says "Tileable". Click OK to apply.
Now we've added a little bit of wave to our texture. It should look like this:
.png (47.02 KiB) Viewed 11106 times")
Now to make it feel more realistic.
Download this zip file. It contains a modified version of Askaniy's 2013 Saturn Map. It has the bright band in the middle removed.
 saturnmodified.zip
- (1.42 MiB) Downloaded 323 times
Now unzip it and open the image inside with GIMP. Don't worry about saving your Gas Giant Map. It will always be accessible in the top left corner. The image should look like a gray Saturn. Go to Image > Mode and make sure the mode is RGB.
Now go to the top menu and go to Colors > Color Temperature. Set Intended Temperature all the way to the max value. This helps get rid of unwanted color artifacts that may arise in the next step. It should look like this:
.png (53.62 KiB) Viewed 11106 times")
Now go to Colors > Hue-Chroma. Adjust the three sliders until the color resembles that of your gas giant map. Chroma controls saturation (kinda), Lightness controls lightness, and Hue controls Color/Hue. It should look like this, but insted of blue, it should be the color of your gas giant.
.png (875.15 KiB) Viewed 11106 times")
Added after 9 minutes 32 seconds:
Now CTRL+A (Select All), and then CTRL+C (Copy). Now go to your gas giant map (which should be in the top left corner) and CTRL+V (paste).
Now adjust the Opacity (on the right side menu) to around 45%. However you can adjust it to how you like, as long as it is in between 35 and 55 percent. Use the Select Tool and click outside the canvas to merge the Saturn Map with the bottom layer. It should look more realistic and a little bit like this.
.png (59.28 KiB) Viewed 11105 times")
STEP 5: STORMS
Now, technically we are done and you can use it how it is, but if you want to make it more stormy, follow these instructions:
Choose the Warp Transform Tool (the one that looks like a wave). Change the brush size to about 300. Now start dragging your cursor over the parts that you want to create turbulence in. The brush will distort and "drag" parts of the image toward the cursor. You can experiment with different things. You can also choose a spot and drag the mouse in circles to create GRS type storms. To apply, simply choose the Select Tool. My end result looked like this:
.png (59.1 KiB) Viewed 11105 times")
STEP 6: EXPORTING
Your texture is done! To export, go to File > Export As, and then choose your filename and export destination. Click Export to finish.
If you have any questions about this tutorial, feel free to ask them in this thread.
I hope this helped you and I hope you have a happy texture making experience!