Just a test - 64K Moon

Tips for creating and manipulating planet textures for Celestia.
Avatar
t00fri
Developer
Posts: 8772
Joined: 29.03.2002
Age: 22
With us: 22 years 7 months
Location: Hamburg, Germany

Re: Just a test - 64K Moon

Post #81by t00fri » 14.05.2009, 00:16

Here is where I stand, based on Clementine data for the Moon:

In view of the many artefacts, I confined my attention to a 8k scaled base texture obtained from the 90k original and cleaned that by hand as much as possible. Next, I used the 11520 x 5760 DEM, ulcn2005_clean.cub, that is part of the data->base->dems set of the latest ISIS3 distribution, converted it into a signed 16bit binary file with ISIS2RAW, and reduced it to 8192x4096. This binary texture then served as the input for my nms normalmap tool.

The resulting normalmap is quite a bit smoother than my older bumpmap that is part of the Celestia distribution. But by far not smooth enough:

The first shot from 8k base + 8k normalmap is the best view I could find on my moon texture:
Image

Here you can see already the non-smoothness of the normalmap:
Image

The resolution and rendering of the basemap is quite OK here.

We just got to wait for new data, hopefully coming in the near future...

Fridger
Image

Avatar
t00fri
Developer
Posts: 8772
Joined: 29.03.2002
Age: 22
With us: 22 years 7 months
Location: Hamburg, Germany

Re: Just a test - 64K Moon

Post #82by t00fri » 14.05.2009, 00:20

Reiko wrote:Aha I didn't restart. That's why it didn't work. :D

Are you meaning to say that you got the help text now!??

Fridger
Image

Reiko
Posts: 1119
Joined: 05.10.2006
Age: 41
With us: 18 years 1 month
Location: Out there...

Re: Just a test - 64K Moon

Post #83by Reiko » 14.05.2009, 00:23

t00fri wrote:
Reiko wrote:Aha I didn't restart. That's why it didn't work. :D

Are you meaning to say that you got the help text now!??

Fridger

This is what i get now.

Code: Select all

Microsoft Windows [Version 6.0.6001]
Copyright (c) 2006 Microsoft Corporation.  All rights reserved.

C:\Users\rei>txtiles

Usage: txtiles <channels> <width> <level> [<PNG_compression>]

Version 1.0, August 2007, author: F. Schrempp

--------------------------------------------------------------------
The program reads textures in unsigned bpp x 8 bit integer raw format
from STDIN. It outputs VT tiles with many optimizations in PNG format.
--------------------------------------------------------------------

Units    : tilesize[pixel] = width/2^(level+1).

Input    : Interleaved RGB(A) storage mode ie. RGB(A)RGB(A)RGB(A)...
           for RGB (+ alpha) textures
           Inputwidth : inputheight = 2 : 1, power-of-two size.
           No header.
Default  : PNG_compression = Z_BEST_SPEED = 1
         : best choice for subsequent DXT compression!

For VT tiles in PNG format, enter PNG_compression = 6..9 (slow!)

For 4 x 8 bit RGB + alpha textures enter channels = 4.
For 3 x 8 bit  colored    textures enter channels = 3.
For 1 x 8 bit grayscale   textures enter channels = 1.


C:\Users\rei>


Is that right?

Avatar
John Van Vliet
Posts: 2944
Joined: 28.08.2002
With us: 22 years 2 months

Re: Just a test - 64K Moon

Post #84by John Van Vliet » 14.05.2009, 00:55

--- edit ---
Last edited by John Van Vliet on 21.10.2013, 02:01, edited 1 time in total.

Avatar
Chuft-Captain
Posts: 1779
Joined: 18.12.2005
With us: 18 years 11 months

Re: Just a test - 64K Moon

Post #85by Chuft-Captain » 14.05.2009, 06:56

t00fri wrote:Did you use DXT1 format or PNG for the tiles?
PNG

t00fri wrote:No problems encountered?
Apart from the GDAL problem, not really.
I did find it necessary to put the location of the bin folder of the GDAL tools in my PATH variable, rather than just the install folder. (ie. "C:\Program Files\FWTools2.3.0\bin" instead of "C:\Program Files\FWTools2.3.0").

t00fri wrote:Were the tools known to the system in any directory by just typing their names at the console prompt?
If you're looking for me to confirm that your registry entries worked correctly, I'm afraid I can't really do so, because I manually added "C:\Program Files\F-TexTools" to the PATH variable to avoid having to reboot.
So yes, they were available in any directory only after opening a new CMD window, but I can't confirm correct action of your installer because I never re-booted.
It seems however that your Japandorian friend has subsequently confirmed your installer works as expected.
"Is a planetary surface the right place for an expanding technological civilization?"
-- Gerard K. O'Neill (1969)

CATALOG SYNTAX HIGHLIGHTING TOOLS LAGRANGE POINTS

Avatar
t00fri
Developer
Posts: 8772
Joined: 29.03.2002
Age: 22
With us: 22 years 7 months
Location: Hamburg, Germany

Re: Just a test - 64K Moon

Post #86by t00fri » 14.05.2009, 07:14

Reiko, CC,

thanks to both for confirmation. Things seem indeed to be working well.
Of course, it's perfectly fine to add the F-TexTools directory by hand to PATH variable.

The DXT1 output will be virtually indistinguishable from PNG at the given initial texture quality, but DXT1 will really be running smoothly...The FastCompression mode should also be sufficient and works indeed fast ;-)

@Reiko: Did you note that you may now download the Clementine64k.bin.zip file from CelestialMatters.
++++++++++++++ Download +++++++++++++++++++++++
http://www.celestialmatters.org/users/t ... 4k.bin.zip
++++++++++++++++++++++++++++++++++++++++++++++

This saves the 1hour conversion time from JP2 to PNG format.
The Download will take only 10-15 minutes if you have a reasonably fast line.

Just follow praesepe's instructions....

@CC:
I did find it necessary to put the location of the bin folder of the GDAL tools in my PATH variable, rather than just the install folder. (ie. "C:\Program Files\FWTools2.3.0\bin" instead of "C:\Program Files\FWTools2.3.0").
That was correctly noted already by Vincent:
Vincent wrote:One more precision:
On Windows, one must add the bin subfolder of the gdal installation folder in the PATH environment:
...\FWTools2.3.0\bin
praesepe has edited his instructions accordingly, as far as I remember...


Fridger
Image

Reiko
Posts: 1119
Joined: 05.10.2006
Age: 41
With us: 18 years 1 month
Location: Out there...

Re: Just a test - 64K Moon

Post #87by Reiko » 14.05.2009, 08:07

t00fri wrote:
@Reiko: Did you note that you may now download the Clementine64k.bin.zip file from CelestialMatters.
++++++++++++++ Download +++++++++++++++++++++++
http://www.celestialmatters.org/users/t ... 4k.bin.zip
++++++++++++++++++++++++++++++++++++++++++++++

This saves the 1hour conversion time from JP2 to PNG format.
The Download will take only 10-15 minutes if you have a reasonably fast line.

Just follow praesepe's instructions....

Is that for the 64k moon? :)
If I made a fictional 16k or bigger 32k texture for an alien planet I can turn it into VT with your tools?

Avatar
t00fri
Developer
Posts: 8772
Joined: 29.03.2002
Age: 22
With us: 22 years 7 months
Location: Hamburg, Germany

Re: Just a test - 64K Moon

Post #88by t00fri » 14.05.2009, 08:13

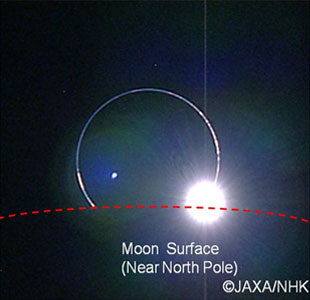
Moon Eclipse Feb 2009 imaged by KAGUYA satellite
++++++++++++++++++++++++++++++++++++++++++++
http://www.jaxa.jp/press/2009/02/20090218_kaguya_e.html
Image

Find below a great HDTV video from KAGUYA, showing the satellite photographing the rising Sun and Earth behind the Moon that is however eclipsed by the Earth (see drawing below) ;-) .


Image

At one point the Sun most brightly reappears as an amazing "diamond ring" effect.

If you want to get an idea about how bright the Sun should be, look at the video.

++++++++++
HDTV video
++++++++++
http://space.jaxa.jp/movie/20090218_kag ... e01_e.html

And now the reconstruction in Celestia (which due to this multiple coincidence also reveals substantial orbital inaccuracies...)...

This is another reminder of the meager brightness of Celestia's Sun, as compared to the HDTV video...Sigh!

Image


Fridger
Last edited by t00fri on 14.05.2009, 09:36, edited 4 times in total.
Image

Avatar
t00fri
Developer
Posts: 8772
Joined: 29.03.2002
Age: 22
With us: 22 years 7 months
Location: Hamburg, Germany

Re: Just a test - 64K Moon

Post #89by t00fri » 14.05.2009, 09:26

Reiko wrote:
t00fri wrote:
@Reiko: Did you note that you may now download the Clementine64k.bin.zip file from CelestialMatters.
++++++++++++++ Download +++++++++++++++++++++++
http://www.celestialmatters.org/users/t ... 4k.bin.zip
++++++++++++++++++++++++++++++++++++++++++++++

This saves the 1hour conversion time from JP2 to PNG format.
The Download will take only 10-15 minutes if you have a reasonably fast line.

Just follow praesepe's instructions....

Is that for the 64k moon? :)
If I made a fictional 16k or bigger 32k texture for an alien planet I can turn it into VT with your tools?

Reiko,

yes the above link is for the 64k Moon (binary input texture). To do the respective VTs (following praesepe's commands) does not take long.

+++++++++++++++++++++++++++++++++++++++++++++++++++++++++++++++++++++
If you want to do VTs from a 16k or 32k fictional texture (PNG format), my tools are ideal.
(highest quality and superfast!)
+++++++++++++++++++++++++++++++++++++++++++++++++++++++++++++++++++++

1) convert the PNG texture to Bin with png2bin. Let tex32k.png be the filename of your big 32k texture, just type in the directory where tex32k.png is located at the console prompt:

png2bin < tex32k.png > tex32k.bin

tex32k.bin is the same texture in binary format that my tools require.

2) Suppose tex32k.bin is a 32k texture in normal RGB color, then its width in pixels is 32768 and the number of color channels is 3 <=> R,G,B. Let's go through this standard case explicitly below.

If you have a texture with an alpha channel as well, then the number of channels is 4 (e.g. a partially transparent cloud texture !) . For a simple grayscale texture, the number of channels is .....guess.... 1. The appropriate number you must enter in the command lines of tx2half and txtiles below.

To start, make a sequence of level0 level1 ... subdirectories
For our 32k example file and standard VTs of 1024x1024 size you need

level0 level1 level2 level3 level4

Just call the needed tools tx2half and txtiles (or txtilesDXT) by their names to learn about the required command arguments and their positions in the command line. txtilesDXT outputs tiles in DXT1 format. For simplicity you may start with PNG tiles (using txtiles).

It all goes VERY quickly for a 16k texture (1-2 minutes, perhaps!). Also 32k is only several minutes.

First, you use the tool tx2half and produce for each level the corresponding input file
of width reduced by appropriate factors of two:

32k => level4:
-----------------
The required file tex32k.bin you got already!
This file should be located in your working directory, where level0...level4 exist also as subdirectories

16k => level3:
-----------------
Type in the working directory:
tx2half 3 32768 < tex32k.bin > tex16k.bin
after the command has ended, move tex32k.bin into the level4 subdirectory

8k => level2:
----------------
Type in the working directory:
tx2half 3 16384 < tex16k.bin > tex8k.bin
after the command has ended, move tex16k.bin into the level3 subdirectory

4k => level1:
----------------
Type in the working directory:
tx2half 3 8192 < tex8k.bin > tex4k.bin
after the command has ended, move tex8k.bin into the level2 subdirectory

2k => level0:
-----------------
Type in the working directory:
tx2half 3 4096 < tex4k.bin > tex2k.bin
after the command has ended, move tex4k.bin into the level1 subdirectory

move finally tex2k.bin into the level0 subdirectory

Now make the VTs in each level, starting at level 4 (which takes longest)
CD to level4
Type in the level4 subdirectory:

txtiles 3 32768 4 < tex32k.bin
when finished, type
cd ..\level3

Type in the level3 subdirectory:
txtiles 3 16384 3 < tex16k.bin
when finished, type
cd ..\level2

Type in the level2 subdirectory:
txtiles 3 8192 2 < tex8k.bin
when finished, type
cd ..\level1

Type in the level1 subdirectory:
txtiles 3 4096 1 < tex4k.bin
when finished, type
cd ..\level0

Type in the level0 subdirectory:
txtiles 3 2048 0 < tex2k.bin

DONE!

In the command line '<' stands for "read file in", while ">" stands for "write file out".
You will realize that this sequence of commands is perfectly suited to be placed into a simple Windows command script, e.g. called vt.bat, such that you only need to start it and everything proceeds automatically ;-)

Good luck,
Fridger
Image

Reiko
Posts: 1119
Joined: 05.10.2006
Age: 41
With us: 18 years 1 month
Location: Out there...

Re: Just a test - 64K Moon

Post #90by Reiko » 14.05.2009, 10:41

Sorry guys but these command line instructions make no sense at all. I can't even get the 64k moon to work.
You are explaining things as if you are on the 51st floor of a building while I stand on the 2nd floor trying to see what you say. 99.9% of the time when I type anything in on the command line I either get "The system cannot find the path specified." or " so and so is not recognized as an internal or external command etc. etc."

Now I see these instructions.

praesepe wrote:I could not agree more with Fridger. I wouldn't mind uploading this VT somewhere and share it with all of you as I always done with all my little contributions but It would take several hours to do as the whole thing weights around 1.1GB. Also, I don't have anywhere to store it as my personal space on shatters is not working at the momment and If it did, bandwidth usage could also be an issue.

Downloading the source data and applying the necessary tools provided by Fridger is the fastest process to have your own VT created in a short time.

I am going to write a little instructions for making this as easy as possible:

Files
-----
- Source data -> Here

- F-TexTools 2.0 -> Here

- Gdal -> Linux or Windows

Process
---------
1.- Create a temporary folder (i.e "tmp") and create all the VT sublevels inside ("level0", "level1", "level2", "level3", "level4", "level5") and drag the source data (UVVIS_Clementine_Basemap_v2_ll.jp2) file there.

2.- Open your cmd (Windows-Start->run->cmd.exe) or your prefered Linux terminal and go to the temporary folder you created.

3.- Copy and paste the following code into your cmd shell/terminal

Code: Select all

 gdal_translate -of png UVVIS_Clementine_Basemap_v2_ll.jp2 Clementine.png
png2bin < Clementine.png > clementine.bin
tx2pow2 1 92160 < Clementine.bin > level5\64k.bin
tx2half 1 65536 < level5\64k.bin > level4\32k.bin
tx2half 1 32768 < level4\32k.bin > level3\16k.bin
tx2half 1 16384 < level3\16k.bin > level2\8k.bin
tx2half 1 8192 < level2\8k.bin > level1\4k.bin
tx2half 1 4096 < level1\4k.bin > level0\2k.bin
cd level5
txtiles 1 65536 5 < 64k.bin
cd ..
cd level4
txtiles 1 32768 4 < 32k.bin
cd ..
cd level3
txtiles 1 16384 3 < 16k.bin
cd ..
cd level2
txtiles 1 8192 2 < 8k.bin
cd ..
cd level1
txtiles 1 4096 1 < 4k.bin
cd ..
cd level0
txtiles 1 2048 0 < 2k.bin
cd ..


Note for Windows users: Make sure to add the "bin" subfolder of your gdal installation to your PATH environment.

This will produce VT tiles in PNG format, if you want them in DXT just replace "txtiles" command for "txtilesdxt".

Two "click and go" batch files for autoprocessing are available here-> PNG tiles or DXT tiles

Then I see this..
@CC:
I did find it necessary to put the location of the bin folder of the GDAL tools in my PATH variable, rather than just the install folder. (ie. "C:\Program Files\FWTools2.3.0\bin" instead of "C:\Program Files\FWTools2.3.0").
That was correctly noted already by Vincent:
Vincent wrote:One more precision:
On Windows, one must add the bin subfolder of the gdal installation folder in the PATH environment:
...\FWTools2.3.0\bin
praesepe has edited his instructions accordingly, as far as I remember...


Fridger

My folder path is "C:\Program Files (x86)\FWTools2.3.0\bin"

Am I supposed to put that giant bin download in that folder and hope for the best?
Type that command in first and paste the rest of what praesepe said into the cmd prompt?

I know you guys put a lot of effort into making this stuff as easy as possible but it's like you make it for people you expect to know what you already know.

Avatar
t00fri
Developer
Posts: 8772
Joined: 29.03.2002
Age: 22
With us: 22 years 7 months
Location: Hamburg, Germany

Re: Just a test - 64K Moon

Post #91by t00fri » 14.05.2009, 11:26

Reiko wrote:
My folder path is "C:\Program Files (x86)\FWTools2.3.0\bin"

Am I supposed to put that giant bin download in that folder and hope for the best?
Type that command in first and paste the rest of what praesepe said into the cmd prompt?

I know you guys put a lot of effort into making this stuff as easy as possible but it's like you make it for people you expect to know what you already know.

Reiko,

the above mail between CC and me referred to the installation of GDAL, which you don't need if you instead download the converted input file Clementine64k.bin.zip from the CM link I gave you. Then just unzip it and check beforehand whether you still got several GB of hd space!

In the console, you can always change between directories with the CD command! So the best is to create a new working directory, let's say you call it MoonVTs.

This you do like this from the console prompt

Code: Select all

> cd \

which should lead you to the top directory of your disk C:

To create your new working directory there, type at the prompt

Code: Select all

> mkdir MoonVTs

then check whether it worked by typing

Code: Select all

> dir

This lists all files and directories in disk C. Look for the name MoonVTs. Then change to that new directory by typing

Code: Select all

> cd MoonVTs

Next you can download the file Clementine64k.bin.zip via your browser e.g. onto the desktop and then unzip it into your new C:\MoonVTs working directory with your unzip application. I suppose you know how to do these standard Windows operations?

From the console and still being inside C:\MoonVTs you then type

Code: Select all

> dir

and should have the new file Clementine64k.bin listed there!

From there you can proceed with praesepe's instructions.
Except he called Clementine64k.bin --> 64k.bin etc.

So let's rename the file to match praesepe's notation. For this type at the console prompt

Code: Select all

> rename Clementine64k.bin  64k.bin
> dir


Did it work?
If you want to know a listing and HELP for ALL console commands, just type

Code: Select all

> help

If you want to know the syntax of rename, type subsequently

Code: Select all

> help rename

Before starting with praesepe's instructions, you still need to create in MoonVTs the following level0...level5 subdirectories. You type with the command you have learned already:

Code: Select all

> mkdir level0
> mkdir level1
> mkdir level2
> mkdir level3
> mkdir level4
> mkdir level5

check whether these level directories now exist, with

Code: Select all

> dir

Copy your renamed 64k Moon file 64k.bin into level5 with the command:

Code: Select all

> copy 64k.bin level5


Now you are ready:
In praesepe's instruction set you now got to proceed from here

Code: Select all

tx2half 1 65536 < level5\64k.bin > level4\32k.bin
tx2half 1 32768 < level4\32k.bin > level3\16k.bin
tx2half 1 16384 < level3\16k.bin > level2\8k.bin
tx2half 1 8192 < level2\8k.bin > level1\4k.bin
tx2half 1 4096 < level1\4k.bin > level0\2k.bin
cd level5
txtiles 1 65536 5 < 64k.bin
cd ..
cd level4
txtiles 1 32768 4 < 32k.bin
cd ..
cd level3
txtiles 1 16384 3 < 16k.bin
cd ..
cd level2
txtiles 1 8192 2 < 8k.bin
cd ..
cd level1
txtiles 1 4096 1 < 4k.bin
cd ..
cd level0
txtiles 1 2048 0 < 2k.bin
cd ..


Good luck,
Fridger
Image

Reiko
Posts: 1119
Joined: 05.10.2006
Age: 41
With us: 18 years 1 month
Location: Out there...

Re: Just a test - 64K Moon

Post #92by Reiko » 14.05.2009, 12:22

YAY!! it worked! Thank you for your patience and time explaining instructions in more detail Fridger. :blue: It seemed to take less than 10 minutes to complete.
Did notice some oddities though.

Image

Those black gaps pop up in some places and seams.

Avatar
t00fri
Developer
Posts: 8772
Joined: 29.03.2002
Age: 22
With us: 22 years 7 months
Location: Hamburg, Germany

Re: Just a test - 64K Moon

Post #93by t00fri » 14.05.2009, 12:43

Reiko wrote:YAY!! it worked! Thank you for your patience and time explaining instructions in more detail Fridger. :blue: It seemed to take less than 10 minutes to complete.
Did notice some oddities though.

Those black gaps pop up in some places and seams.

Reiko,

congratulations!! :blue: :blue: I am always happy to watch people being persistent enough to overcome initial obstacles in the learning domain!

Image

Unfortunately in the original scientific Clementine moon data, there are MANY such artefacts. Notably many black pixel blocks and lines. They are inserted to mark places where some hardware faults have taken place during the measurements...
Certainly NOT associated with my F-TexTools...

How long is that black line you were showing?

I am still working to try and remove all the black stuff automatically by computer (ISIS3 routines).

Isn't it a bit late for you, meanwhile? Turning into an Andorian "nightowl"? ;-)

Fridger
Image

Reiko
Posts: 1119
Joined: 05.10.2006
Age: 41
With us: 18 years 1 month
Location: Out there...

Re: Just a test - 64K Moon

Post #94by Reiko » 14.05.2009, 13:04

t00fri wrote:
Reiko wrote:YAY!! it worked! Thank you for your patience and time explaining instructions in more detail Fridger. :blue: It seemed to take less than 10 minutes to complete.
Did notice some oddities though.

Those black gaps pop up in some places and seams.

Reiko,

congratulations!! :blue: :blue: I am always happy to watch people being persistent enough to overcome initial obstacles in the learning domain!

Image

Unfortunately in the original scientific Clementine moon data, there are MANY such artefacts. Notably many black pixel blocks and lines. They are inserted to mark places where some hardware faults have taken place during the measurements...
Certainly NOT associated with my F-TexTools...

How long is that black line you were showing?

I am still working to try and remove all the black stuff automatically by computer (ISIS3 routines).

Isn't it a bit late for you, meanwhile? Turning into an Andorian "nightowl"? ;-)

Fridger

I didn't notice how long that particular black line was. I saw another that was short. I'm glad it's the original data and not your tools. I thought I did something wrong. :P

It's beyond late for me. It's so late it's early now. :)

danielj
Posts: 1477
Joined: 15.08.2003
With us: 21 years 3 months

Re: Just a test - 64K Moon

Post #95by danielj » 17.05.2009, 15:40

There is an intermediate solution...the same way as someone did for a Normal Map for Earth BMNG,someone could create an script to make the 64K (or even 32K Moon texture map).The script is surely much smaller than the texture itself and could be send by email or even pm!

Avatar
t00fri
Developer
Posts: 8772
Joined: 29.03.2002
Age: 22
With us: 22 years 7 months
Location: Hamburg, Germany

Re: Just a test - 64K Moon

Post #96by t00fri » 17.05.2009, 18:42

danielj wrote:There is an intermediate solution...the same way as someone did for a Normal Map for Earth BMNG,someone could create an script to make the 64K (or even 32K Moon texture map).The script is surely much smaller than the texture itself and could be send by email or even pm!

Absolutely! That is the idea. Cartrite, for example, has written a very convenient script for Windows to do the full 64k VT set for Earth. Since it's always the same sort of operations, a modification to apply to the Moon is close to trivial. The Moon is much simpler, since there is no specular texture to add in. Also the normalmap for the Moon is perhaps not worth the effort yet, since the quality of the elevation data is pretty bad.

The modification of cartrite's script could easily be done by most users. It needs absolutely NO ingenuity to do...

Fridger
Image

danielj
Posts: 1477
Joined: 15.08.2003
With us: 21 years 3 months

Re: Just a test - 64K Moon

Post #97by danielj » 17.05.2009, 20:27

But where can I find this script?

Avatar
t00fri
Developer
Posts: 8772
Joined: 29.03.2002
Age: 22
With us: 22 years 7 months
Location: Hamburg, Germany

Re: Just a test - 64K Moon

Post #98by t00fri » 17.05.2009, 20:39

danielj wrote:But where can I find this script?

I have a copy, but it's better to wait for cartrite's response. He might have made some more recent changes. Also his website does not operate anymore.

Steeeeeeeeeeeeeve! ;-)

Fridger
Image

Avatar
cartrite
Posts: 1978
Joined: 15.09.2005
With us: 19 years 2 months
Location: Pocono Mountains, Pennsylvania, USA Greate Grandfother from Irshava, Zakarpattia Oblast Ukraine

Re: Just a test - 64K Moon

Post #99by cartrite » 17.05.2009, 20:49

I was trying to modify it to do the moon. But I'm stuck on creating a ssc file.
Would it look like this?

Code: Select all

AltSurface "64k-Moon-VT" "Sol/Earth/Moon"
{
       Texture "64k-moon.ctx"
}
Or something like this?

Code: Select all

AltSurface "Moon:Earth II" "Sol/Earth"{
       Texture "64k-moon.ctx"
}

I don't run windows xp anymore so there is no way for me to test the script.
cartrite
VivoBook_ASUSLaptop X712JA_S712JA Intel(R) UHD Graphics 8gb ram. Intel(R) Core(TM) i5-1035G1 CPU @ 1.00GHz, 1190 Mhz, 4 Core(s), 8 Logical Processor(s) 8 GB ram. Running on Windows 11 and OpenSuse 15.4

Avatar
cartrite
Posts: 1978
Joined: 15.09.2005
With us: 19 years 2 months
Location: Pocono Mountains, Pennsylvania, USA Greate Grandfother from Irshava, Zakarpattia Oblast Ukraine

Re: Just a test - 64K Moon

Post #100by cartrite » 17.05.2009, 21:05

I tried to modify it to use the Clemintine file at CM. I can't test it on Windows so................
THIS FILE HAD PROBLEMS/ REMOVED IT.

cartrite
Last edited by cartrite on 18.05.2009, 12:04, edited 1 time in total.
VivoBook_ASUSLaptop X712JA_S712JA Intel(R) UHD Graphics 8gb ram. Intel(R) Core(TM) i5-1035G1 CPU @ 1.00GHz, 1190 Mhz, 4 Core(s), 8 Logical Processor(s) 8 GB ram. Running on Windows 11 and OpenSuse 15.4


Return to “Textures”