Page 1 of 2
Real Time 3D: some tips to optimize your models.
Posted: 30.07.2006, 15:01
by ElChristou
Folks,
It?€™s not the first time I?€™m talking about the optimization of 3D models, but because a few people are increasing their skills in 3D modeling, I think it?€™s time to give some example of classical ?€?errors?€
Posted: 30.07.2006, 17:59
by selden
One minor point:
Some people like to go inside models and look around. It can be somewhat disturbing to do that and discover that the spacecraft has disappeared!
Posted: 30.07.2006, 18:30
by ElChristou
selden wrote:One minor point:
Some people like to go inside models and look around. It can be somewhat disturbing to do that and discover that the spacecraft has disappeared!
This is not a minor point; if the inside is represented (like for the Flight Deck of my shuttle) very well, but I suppose visiting the inside of a model to see irrelevant meshes (or part of meshes) don't make much sense... or not?
Real time 3D is in general like the movie industry, all is... ...fake, just one side of the "reality" is represented... (for obvious reasons...)
Posted: 30.07.2006, 18:41
by selden
All I can say is that while exploring one of your shuttle models, I was slightly disappointed to find that the cargo bay was invisible (transparent) from the inside. A low-poly cylinder would have been reasonable, I think.
Posted: 30.07.2006, 18:53
by ElChristou
You are right, but this kind of exercise must be controled, one of course is free to create an "inside" (even low poly), but this has nothing to do with the global optimization of a model (the topic of the thread)...
Concerning the shuttle, Tx for your opinion, I was thinking in adding such a fake closed payload but as I must return on the shuttle to end many details, this will be done in time.
Posted: 30.07.2006, 23:14
by selden
Sorry I wasn't clear. I tend to not include all of the words I should.
I was concerned that some of your recommendations to delete internal, unseeable surfaces would make some parts of an object invisible (transparent) when it is explored on the inside. The person creating the object must decide which surfaces are important to the design of the object. Surfaces which never can be seen should, of course, not be created.
Re: Real Time 3D: some tips to optimize your models.
Posted: 31.07.2006, 14:29
by Chuft-Captain
El C,
Thanks for the tips, however the one piece of information which seems to be missing is how you actually
performed the optimizations in your modelling tool, particularly in the cases below, and what affect (if any) the re-designed polygons have on
already existing texture mapping.
This would also be useful information I think.
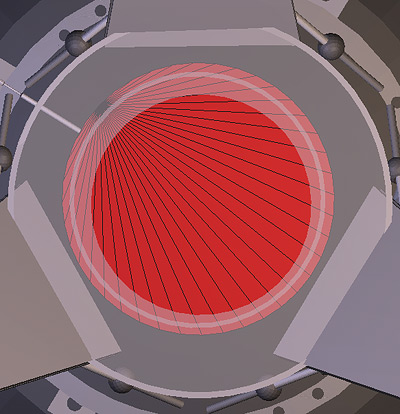
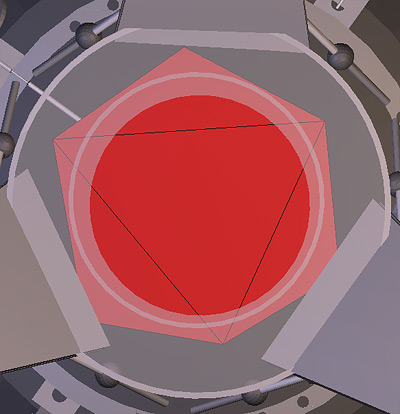
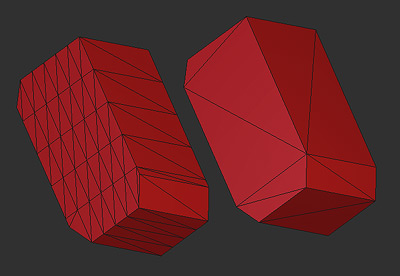
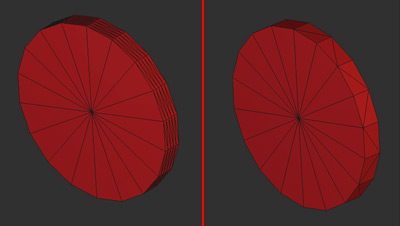
For example, would it be possible for you to elaborate on how you reduced the segmented mesh on the left (below) to the one on the right. I guess techniques will vary depending on the modeller's choice of tool, but I suspect it's not always as simple as executing an "optimize" command. Personally, I use Anim8tor, but blender is also popular.
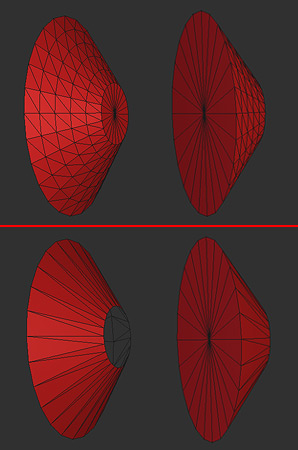
Slightly off topic, but another issue specific to Celestia affecting FPS (sometimes significantly) is the number of orbiting objects in the FOV.
Before rendering each object, it's position in it's elliptical orbit (and hence in the field of view) must first be recalculated.
If you have lots of objects in the same vicinity, this seems to have a significant impact on FPS, in addition to the rendering overhead.
(Note: I'm talking about 100's of objects, rather than just a few here)
Posted: 31.07.2006, 14:31
by ElChristou
selden wrote:Sorry I wasn't clear. I tend to not include all of the words I should.
I was concerned that some of your recommendations to delete internal, unseeable surfaces would make some parts of an object invisible (transparent) when it is explored on the inside. The person creating the object must decide which surfaces are important to the design of the object. Surfaces which never can be seen should, of course, not be created.
Exact, in general, the external meshes of a model won't be very useful to create an internal structure; if such structure is created, it should be optimized like the above example...
Posted: 31.07.2006, 14:36
by Chuft-Captain
selden wrote:All I can say is that while exploring one of your shuttle models, I was slightly disappointed to find that the cargo bay was invisible (transparent) from the inside. A low-poly cylinder would have been reasonable, I think.
I too was rather surprised, when I experienced this "effect" when in the payload bay, as in every other respect, your shuttle was impressive in the amount of detail.
It was a little strange to see the SME's suspended in space behind the cabin.
Made me think the
Philadelphia Experiment was alive and well.

Re: Real Time 3D: some tips to optimize your models.
Posted: 31.07.2006, 14:52
by ElChristou
Chuft-Captain wrote:El C,
Thanks for the tips, however the one piece of information which seems to be missing is how you actually performed the optimizations in your modelling tool, particularly in the cases below, and what affect (if any) the re-designed polygons have on already existing texture mapping.
This would also be useful information I think.
For example, would it be possible for you to elaborate on how you reduced the segmented mesh on the left (below) to the one on the right. I guess techniques will vary depending on the modeller's choice of tool, but I suspect it's not always as simple as executing an "optimize" command. Personally, I use Anim8tor, but blender is also popular.
As you have corectly guess, this depend of the soft you are using and an "optimize" command do not exist...
All this is based on vertex manipulation and merging of the coexisting ones. This is why it's such a pain to optimize a model, in certain case better redo the whole stuff than try to optimize it... It's why it's much better to have such examples in mind and try not to do such "errors" from the beginning.
Concerning the mapping, this depend also of the soft you use; in my case for example, as I import a 3DS in my 3D soft I lose the mapping.
Chuft-Captain wrote:Slightly off topic, but another issue specific to Celestia affecting FPS (sometimes significantly) is the number of orbiting objects in the FOV.
Before rendering each object, it's position in it's elliptical orbit (and hence in the field of view) must first be recalculated.
If you have lots of objects in the same vicinity, this seems to have a significant impact on FPS, in addition to the rendering overhead.
(Note: I'm talking about 100's of objects, rather than just a few here)
This is normal, Celestia load the objects with their textures, so clearly more object more lost of FPS; it's also why optimized models are always welcome, less poly, less datas, better FPS. Imagine an asteroid field similar to those shown in StarWars, using models with too much poly will put whatever computer on the knees... Even using optimized low poly count models, if you put hundreds or thousands of them you will "kill" you config...
Re: Real Time 3D: some tips to optimize your models.
Posted: 07.08.2006, 23:43
by rthorvald
[quote="ElChristou"]Folks,
It?€™s not the first time I?€™m talking about the optimization of 3D models, but because a few people are increasing their skills in 3D modeling, I think it?€™s time to give some example of classical ?€?errors?€
Posted: 08.08.2006, 01:48
by ElChristou
Tx Runar, indeed, this is a basic tut, so basic that generally no one want to spend time to explain such things... a pity because for newbie I think it can really participate in a better (clearer) comprehension of what is really necessary for the definition of a volume...
For Chuft:
Here is a way to do correctly this mesh; as this is not my model, I want to respect exactly the original geometry so I will extract some lines from the original mesh:

1- original mesh
2- extraction of the elements needed for a new extrusion (in red a section, in yellow an extruding path)
3- Section and extruding path alone
4- after extrusion (no triangulation)
5- corrected mesh (with triangulation)
You note it's much faster in this case to redo the mesh than to try to merge the useless points to achieve step 5.
If you can think this mesh directly from step 3... better!

Posted: 08.08.2006, 12:16
by Chuft-Captain
Thanks El C,
Would it be possible for you to post the object on the left (in .3ds format) so that I can practice with it in Anim8tor?
I assume you selected the outside edges (in red), filled the resulting shape, and then just used the yellow arc as a guide to how far to extrude it into a solid object.
At least, I think this is how I would have to do it in Anim8tor, which might be slightly different to how you do it.
JOOI, which tool do Do U use? (Ani8tor, Blender, other...?)
Re: Real Time 3D: some tips to optimize your models.
Posted: 08.08.2006, 12:35
by Chuft-Captain
ElChristou wrote:Chuft-Captain wrote:Slightly off topic, but another issue specific to Celestia affecting FPS (sometimes significantly) is the number of orbiting objects in the FOV.
Before rendering each object, it's position in it's elliptical orbit (and hence in the field of view) must first be recalculated.
If you have lots of objects in the same vicinity, this seems to have a significant impact on FPS, in addition to the rendering overhead.
(Note: I'm talking about 100's of objects, rather than just a few here)
This is normal, Celestia load the objects with their textures, so clearly more object more lost of FPS; it's also why optimized models are always welcome, less poly, less datas, better FPS. Imagine an asteroid field similar to those shown in StarWars, using models with too much poly will put whatever computer on the knees... Even using optimized low poly count models, if you put hundreds or thousands of them you will "kill" you config...
All true

, but the point I was trying to make (not very eloquently) is that, all things being equal,
multiple models will have lower FPS than the same number of polys in a
single object.
eg. A single 100,000 polygon object in the FOV, will have a higher FPS than if you split it up into 1000 objects of 100 poly's each.
Rendering overhead is the same (same # of total polygons), but 999 additional orbital positions must be determined before each frame can be rendered.

This of course will be extra CPU clock cycles, rather than GPU cycles.
Posted: 08.08.2006, 16:42
by ElChristou
Chuft-Captain wrote:Thanks El C,
Would it be possible for you to post the object on the left (in .3ds format) so that I can practice with it in Anim8tor?
I assume you selected the outside edges (in red), filled the resulting shape, and then just used the yellow arc as a guide to how far to extrude it into a solid object.
At least, I think this is how I would have to do it in Anim8tor, which might be slightly different to how you do it.
which tool do Do U use? (Ani8tor, Blender, other...?)
You can download the mesh
HERE
Extruding is always the same; a section of the future mesh along a path...
Some soft will then create directly the mesh, other will create a tube like mesh then you will have to close both extremities...
I'm using a comercial soft called Amapi pro v7.5; it's a powefull 3D
modeler much more intuitive (so very easy to use) than the classic complete 3D suite like Max, Maya or Blender...
Posted: 09.08.2006, 12:43
by Chuft-Captain
ElChristou wrote:Here is a way to do correctly this mesh; as this is not my model, I want to respect exactly the original geometry so I will extract some lines from the original mesh:

1- original mesh
2- extraction of the elements needed for a new extrusion (in red a section, in yellow an extruding path)
3- Section and extruding path alone
4- after extrusion (no triangulation)
5- corrected mesh (with triangulation)
You note it's much faster in this case to redo the mesh than to try to merge the useless points to achieve step 5.
If you can think this mesh directly from step 3... better!

Thanks El C,
I don't think it's quite as straightforward in Anim8tor. The trouble I always run into in Anim8tor is that once something becomes a mesh, it can't be extruded (which makes sense), but the trouble is that I haven't found a way to "extract" or convert a
mesh into a
path (which can be extruded). ie. You seem to be able to easily extract section and path from a mesh for re-extrusion in your commercial tool. (NOT so in Anim8tor)
eg. I can get to (something like) step 3 above, by deleting points and lines from the mesh to end up with this:

but it's still a
mesh, so cannot be extruded...

To date, I've found no way to change a mesh into a path (even when the mesh is 2 dimensional).
I don't know if this is a problem specific to Anim8tor, or modelling in general, or maybe just my ignorance of Anim8tor features...(maybe there IS a way in Anim8tor to convert a mesh to a path, or extract a path from a mesh...)
Any advice from other Anim8tor users?
Posted: 09.08.2006, 12:56
by selden
CC,
Anim8or's point edit mode has a "Fill Holes" option in the Edit menu. That might help.
Also, there's a "convert to spline" option in the Mesh menu. (spline == path)
Posted: 09.08.2006, 14:40
by Chuft-Captain
selden wrote:Anim8or's point edit mode has a "Fill Holes" option in the Edit menu. That might help.
Also, there's a "convert to spline" option in the Mesh menu. (spline == path)
Thanks Selden,
I'm not sure what "Fill Holes" is supposed to do, but for me it does nothing. Can you explain an example of it's use perhaps?
"convert to spline" is only ever enabled in object mode (as opposed to "point" mode) and also does nothing when I select this object...I've gtried to do this many times in the past without a single success! If anyone can explain the secret of getting this to work, I'll be very appreciative.

It still complains about it being a mesh, when I then try to extrude (after "convert to spline").
In point edit mode, "convert to spline" is greyed out.
Unfortunately, Anim8tor seems to be very "modal" (4 modes) and inconsistent in the way it works (you have to switch into a certain mode, and select the right tool, before performing a certain operation, and then switch into a different mode to do the next thing, etc.... Can get pretty frustrating.
The documentation is very basic as well and doesn''t have any information about anything but the most basic operations. It would certainly help if the documentation was more detailed, as there are a lot of features and procedures which are not documented.
Posted: 09.08.2006, 15:07
by selden
CC,
Unfortunately, I just realized that filling the hole won't reduce the number of points, edges and faces as is desired. It'll just recreate the ones that existed previously

In other words, it might be best to create the optimal object from scratch as ElChristou mentioned at one point.
(Filling holes is described in the Anim8or manual in the section "Adding Faces".)
switch to "point edit mode"
display wire mesh (ctl-W)
select line edit ( of the three point, line, face)
select "select" (the arrow)
select (left-click-on) an edge adjacent to the hole
select (right-click-on) the other edges adjacent to the hole
select the menu item Edit/Fill Hole ( or type J)
Posted: 09.08.2006, 16:14
by ElChristou
Guys, in this case, the extraction of the desired elements to redo (by extrusion) the mesh seems to be the problem; is there no line tool in point mode in Anim8or (spline are useless in this case)? what is this tool next to "UV" in the first picture?
If a line tool is available, you should be able to redaw the section using only the points as show in my example, begining by one of those points which will be the reference for this section...
Indeed, one must try many things specialy if the documentation is pretty "light"; those functions MUST be there (line tool, extrusion), if not, definitively you should try another soft because those functions are really basical...


