On January 3rd, 1818, Venus transited Venus as seen from the north Pacific. Nobody recorded seeing it though.
Here's Celestia's view of that event, shortly after first contact
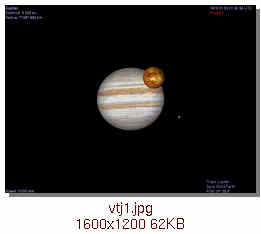
(this is a link to a high resolution image.)
The viewpoint is from over Hawaii.
Venus has no clouds in this interpretation.
Ganymede is also visible. I suspect it'll be in a slightly different position when seen using 1.2.5 final.
Venus Transit of Jupiter in 1818
How do you generate that view? how do you make Jupiter so big in the background? Thanks.
I have Celestia v1.2.5 running on the following machine:
Dell Dimension8200
WinXP Pro/SP1
P4 2.53Ghz 533MhzFSB
2Gb RDRAM PC800
ATI RADEON8500 PRO 128MB videocard
Viewsonic VP230mb 23.1" LCD 1600x1200 native
2 HD 120Gb each
Dell Dimension8200
WinXP Pro/SP1
P4 2.53Ghz 533MhzFSB
2Gb RDRAM PC800
ATI RADEON8500 PRO 128MB videocard
Viewsonic VP230mb 23.1" LCD 1600x1200 native
2 HD 120Gb each
- John Van Vliet
- Posts: 2944
- Joined: 28.08.2002
- With us: 22 years 4 months
-
Topic authorselden
- Developer
- Posts: 10192
- Joined: 04.09.2002
- With us: 22 years 4 months
- Location: NY, USA
I didn't do anything special to get the relative sizes, other than to try to emulate an Earth-bound observer. Here's one way to do it:
1) go to an appropriate date,
2) turn on "sync orbit"
(so the Earth-relative position doesn't change by accident)
3) go to an appropriate viewing location
4) select one of the two planets
5) turn on "track"
6) increase magnification until they're visible
(If you're using high resolution textures, some of the magnification steps will be very slow when the planet images change from dots to circles)
Celestia makes it all too easy...
Selden
-
- Posts: 243
- Joined: 24.11.2002
- With us: 22 years 1 month
- Location: Delta Quadrant
Venus Transit of Jupiter in 1818
selden wrote:On January 3rd, 1818, Venus transited Venus as seen from the north Pacific.
You mean "...Venus transited Jupiter..."
I used your instructions to see that transit of venus over Jupiter. I was wondering if your altitude you place yourself was higher than mine. My altudite was .03 meters off the surface of earth over the big island of hawlii. If so it was daylight when the transit occur and thats why nobody recorded it. Check it out and see.
Also I want to thank you for posting your instructions for this. I'm just learning how to use this program and its fun and like you said
"celesita makes it easy" that is if you know how to follow instruction like the one you posted.
Also I want to thank you for posting your instructions for this. I'm just learning how to use this program and its fun and like you said
"celesita makes it easy" that is if you know how to follow instruction like the one you posted.
- t00fri
- Developer
- Posts: 8772
- Joined: 29.03.2002
- Age: 22
- With us: 22 years 9 months
- Location: Hamburg, Germany
Maneuvering in 1.2.5
The two most convenient shortcuts to play with in the above context are:
1) /Zoom/, i.e changing the /field of view/: SHIFT + dragging left mouse key
By pushing the /middle/ mouse key (wheel button) repeatedly, you
toggle between the last field of view and the standard field of view of 45 degrees. This is most handy to quickly switch between a /telescopic view/ (small FoV) and a naked eye view (FoV=45deg) of the object.
2) /Distance/ changing: CTRL + dragging left mouse key
These provide very smooth adjustments. It is completely trivial this way, for example, to arrive at a widely different apparent size ratio of Venus and Jupiter above.
Landing on an object (e.g. earth) at a particular spot is done as follows:
Select the spot where you want to land from space and place yourself right vertically over it. Then press the HOME key and watch the distance decreasing (top left in the display). Stop latest at about 20m above surface, in order to avoid residual instabilities. Then push the new 'look back' key: '*' that I incorporated in 1.2.5. and then you enter|select the object you want to look at and finally push 'c' to center it in the field. Now you are ready for zooming in etc.
Bye Fridger