Lines between stars or fictional planet systems

General discussion about Celestia that doesn't fit into other forums.
Topic author
TutliQ
Posts: 8
Joined: 11.10.2007
With us: 16 years 7 months
Location: Ulan-Ude
Contact:

Lines between stars or fictional planet systems

Post #1by TutliQ » 11.10.2007, 14:54

Well... I know that my question seems very strange and maybe even silly :roll:

Is there any way to create in Celestia random lines (with various colors and thickness) between stars like the constellation lines or borders? I'm trying to use Celestia as a starmap where I can locate the sphere of influence of some fiction star states like the Minbari Federation (B5) or Clan's territory (BattleTech), or something else. It's very difficult to locate in space even the Rim - the edge of known space, - Periphery or fringe world without visible line. In Celestia the lines of constellation make a sphere looking (very rough, of course) like the Inner Sphere of BattleTech. Besides in Babylon 5 we may see the "hyperspace route" that connect two systems. It would be very nice if there's some way to create such lines.

Thanks for any advices or opinions ^_^

Avatar
selden
Developer
Posts: 10190
Joined: 04.09.2002
With us: 21 years 8 months
Location: NY, USA

Post #2by selden » 11.10.2007, 16:37

TutliQ,

Your question is neither strange nor silly.

In a future version of Celestia, it may be possible to draw lines in 3D space using a Lua routine call.

At the moment, however, the only options are either
1. modify Celestia's files of constellation lines and borders (asterisms.dat and boundaries.dat respectively; both are plain-text files)
or
2. create a 3D Nebula model which consists of lines between the appropriate positions in space. This method requires translating from RA, Dec & distance (or some other coordinate system) to Celestia's internal cartesian (xyz) coordinate system, and it requires some programming.

An example using such a model is shown below. It uses Celestia's ASCII CMOD model file format, and is available in the Alliance-Union addon available on the Web page at http://www.lepp.cornell.edu/~seb/celest ... index.html

Image
(this links to a larger picture)

I wrote a Forrtan program to calculate the positions of the appropriate stars and hand edited the textual model file to draw the lines between them.
Selden

Avatar
Cham M
Posts: 4324
Joined: 14.01.2004
Age: 59
With us: 20 years 3 months
Location: Montreal

Post #3by Cham » 11.10.2007, 21:24

That's the kind of "layers" (or "custom classes") I want to add in Celestia : models of coordinate grids, lines drawn between stars, with labels, etc.

I would be very curious to see that famous "alien map" from the Betty Hills case, wathever what it is actually.
Last edited by Cham on 12.10.2007, 02:29, edited 1 time in total.
"Well! I've often seen a cat without a grin", thought Alice; "but a grin without a cat! It's the most curious thing I ever saw in all my life!"

Avatar
Cham M
Posts: 4324
Joined: 14.01.2004
Age: 59
With us: 20 years 3 months
Location: Montreal

Post #4by Cham » 12.10.2007, 02:28

I was inspired by Selden's addon. So I made a small one, to draw a red line between our Sol and the nearest star : Proxima Cen.

Here's the DSC definition I'm using :

Code: Select all

# draw an highway to Proxima Centauri

Nebula "Proxima Highway"
{
   Mesh "proxima.cmod"
   Axis [ 1 0 0 ]
   Angle 66.5608
   Position [ 0 0 0 ]
   Radius      100
}


And here's the CMOD definition :

Code: Select all

#celmodel__ascii

material  # 0
   diffuse  0 0 0  # Invisible
   opacity 0
end_material

material  # 1
   diffuse  1 0 0  # Red
   opacity 0.7
end_material

mesh  # Invisible mesh to center the model in Celestia
  vertexdesc position f3 end_vertexdesc

vertices  6
100 0 0
-100 0 0
0 100 0
0 -100 0
0 0 100
0 0 -100

linestrip 0  2
0 1
linestrip 0  2
2 3
linestrip 0  2
4 5

end_mesh  # End of invisible mesh

mesh
  vertexdesc position f3 end_vertexdesc

vertices  2
0   0   0
-1.5380140129483257   1.1771770555803778   3.749288876012316

linelist 1  2
0 1

end_mesh


In the extra directory, just create a text file called "proxima.dsc" and paste in the content of the first code above. In a models directory, create a text file called "proxima.cmod" and paste in the content of the second code above. In celestia, you'll get a nice red line joining Sol and Proxima Centauri (after you turn ON the nebulae).

Also, create a text file called "proxima.cel" and paste in the code below. Use it as a script to mark Proxima. Fits very well with the red line.

Code: Select all

{
mark { object "Proxima Cen" size 7 color [1 0 0] symbol "disk" }
}


I'm now tempted to draw some star maps using this simple technique, thanks to Mathematica. :mrgreen:
"Well! I've often seen a cat without a grin", thought Alice; "but a grin without a cat! It's the most curious thing I ever saw in all my life!"

bdm
Posts: 461
Joined: 22.07.2005
With us: 18 years 9 months
Location: Australia

Post #5by bdm » 12.10.2007, 02:36

I have used the asterisms.dat file to show routes between stars. The following image is from my website:

Image
(I added the star labels with Photoshop)

Avatar
Cham M
Posts: 4324
Joined: 14.01.2004
Age: 59
With us: 20 years 3 months
Location: Montreal

Post #6by Cham » 12.10.2007, 02:41

bdm,

the problem with your approach is you can't change the lines color at will (two routes with different colors, say). And you're losing the standard asterisms.

bdm wrote:(I added the star labels with Photoshop)

Cheater !
:wink:
"Well! I've often seen a cat without a grin", thought Alice; "but a grin without a cat! It's the most curious thing I ever saw in all my life!"

bdm
Posts: 461
Joined: 22.07.2005
With us: 18 years 9 months
Location: Australia

Post #7by bdm » 12.10.2007, 02:53

Cham wrote:bdm,

the problem with your approach is you can't change the lines color at will (two routes with different colors, say). And you're losing the standard asterisms.

I posted the illustration to show the effect of changing the asterism file on its own.

I can change the colours if I wanted to, using Photoshop. If someone wants to set the line colours within Celestia, that is somewhat more difficult. Using the asterisms file, one can have Celestia use any colour one wants, so long as it's purple.

I also have the standard asterism file backed up if I need to use it.

Avatar
Cham M
Posts: 4324
Joined: 14.01.2004
Age: 59
With us: 20 years 3 months
Location: Montreal

Post #8by Cham » 12.10.2007, 02:55

bdm wrote:Using the asterisms file, one can have Celestia use any colour one wants, so long as it's purple.


??? :?
"Well! I've often seen a cat without a grin", thought Alice; "but a grin without a cat! It's the most curious thing I ever saw in all my life!"

bdm
Posts: 461
Joined: 22.07.2005
With us: 18 years 9 months
Location: Australia

Post #9by bdm » 12.10.2007, 04:04

Cham wrote:
bdm wrote:Using the asterisms file, one can have Celestia use any colour one wants, so long as it's purple.

??? :?


Any customer can have a car painted any colour that he wants so long as it is black.
--Henry Ford (1863-1947), founder of Ford Motor Company

Avatar
Cham M
Posts: 4324
Joined: 14.01.2004
Age: 59
With us: 20 years 3 months
Location: Montreal

Post #10by Cham » 12.10.2007, 06:14

Here's a fun star map. Can you recognize what this is ? :wink:

Just copy-paste the code below into an ascii CMOD file, and use the same DSC code as defined above.

Code: Select all

#celmodel__ascii

material  # 0
   diffuse  0 0 0  # Invisible
   opacity 0
end_material

material  # 1
   diffuse  0.4 0.2 1  # Asterism like blue
   opacity 0.7
end_material

material  # 2
   diffuse  0.6 0.3 0.8  # Purple
   opacity 0.5
end_material

mesh  # Invisible mesh to center the model in Celestia
  vertexdesc position f3 end_vertexdesc

vertices  6
100 0 0
-100 0 0
0 100 0
0 -100 0
0 0 100
0 0 -100

linestrip 0  2
0 1
linestrip 0  2
2 3
linestrip 0  2
4 5

end_mesh  # End of invisible mesh

mesh
  vertexdesc position f3 end_vertexdesc

vertices  12
0   0   0
11.839559231694802   -13.830680534048703   35.088538421904630
11.840108891866306   -13.885743679933867   35.066598912713590
-0.38868518071488567   -8.6962331042416650   31.934804515272440
18.943033816804537   -12.114577866222389   27.594933973384870
32.471414684298410   -28.501663749497130   14.517388868049103
9.2850850340094620   -11.058345642656231   13.497960718521870
10.271798030895820   -5.0136823149833070   3.2640349043642902
20.629562051214470   -9.8947310661042600   -8.449116326845257
33.268188653907270   -5.7715681685305970   -13.131468812316607
27.406174658960490   -13.039101715966941   -27.921667793374088
53.297819234821716   -22.970370459038694   26.055570624379257

linelist 1  10
0 1
1 2
1 3
1 4
1 6

linelist 2  12
4 5
6 7
7 8
8 9
9 10
4 11

end_mesh
"Well! I've often seen a cat without a grin", thought Alice; "but a grin without a cat! It's the most curious thing I ever saw in all my life!"

Topic author
TutliQ
Posts: 8
Joined: 11.10.2007
With us: 16 years 7 months
Location: Ulan-Ude
Contact:

Post #11by TutliQ » 12.10.2007, 07:25

Wow! Thank you :) I'll try to do it right now.

Reiko
Posts: 1119
Joined: 05.10.2006
Age: 40
With us: 17 years 7 months
Location: Out there...

Post #12by Reiko » 12.10.2007, 14:29

selden wrote:TutliQ,

Your question is neither strange nor silly.

In a future version of Celestia, it may be possible to draw lines in 3D space using a Lua routine call.

At the moment, however, the only options are either
1. modify Celestia's files of constellation lines and borders (asterisms.dat and boundaries.dat respectively; both are plain-text files)
or
2. create a 3D Nebula model which consists of lines between the appropriate positions in space. This method requires translating from RA, Dec & distance (or some other coordinate system) to Celestia's internal cartesian (xyz) coordinate system, and it requires some programming.

An example using such a model is shown below. It uses Celestia's ASCII CMOD model file format, and is available in the Alliance-Union addon available on the Web page at http://www.lepp.cornell.edu/~seb/celest ... index.html

Image
(this links to a larger picture)

I wrote a Forrtan program to calculate the positions of the appropriate stars and hand edited the textual model file to draw the lines between them.

Is there a tutorial somewhere on how to do this?

Avatar
selden
Developer
Posts: 10190
Joined: 04.09.2002
With us: 21 years 8 months
Location: NY, USA

Post #13by selden » 12.10.2007, 14:37

Nope, sorry, no such tutorial currently exists for Celestia. You have to know spherical trig and how the astronomical coordinate systems relate to one another. There are quite a few Web pages which discuss generic transforms between cartesian and polar coordinate systems.

I certainly don't have time to write that kind of documentation. Maybe Cham has something?
Selden

Reiko
Posts: 1119
Joined: 05.10.2006
Age: 40
With us: 17 years 7 months
Location: Out there...

Post #14by Reiko » 12.10.2007, 14:53

selden wrote:Nope, sorry, no such tutorial currently exists for Celestia. You have to know spherical trig and how the astronomical coordinate systems relate to one another. There are quite a few Web pages which discuss generic transforms between cartesian and polar coordinate systems.

I certainly don't have time to write that kind of documentation. Maybe Cham has something?

That all sounds beyond my abilities anyways. :oops:

Reiko
Posts: 1119
Joined: 05.10.2006
Age: 40
With us: 17 years 7 months
Location: Out there...

Post #15by Reiko » 12.10.2007, 17:45

Cham wrote:That's the kind of "layers" (or "custom classes") I want to add in Celestia : models of coordinate grids, lines drawn between stars, with labels, etc.

I would be very curious to see that famous "alien map" from the Betty Hills case, wathever what it is actually.


Did that using the asterisms approach.

Image

Here is the map I got the info from.

Image

Avatar
Cham M
Posts: 4324
Joined: 14.01.2004
Age: 59
With us: 20 years 3 months
Location: Montreal

Post #16by Cham » 12.10.2007, 18:45

Reiko,

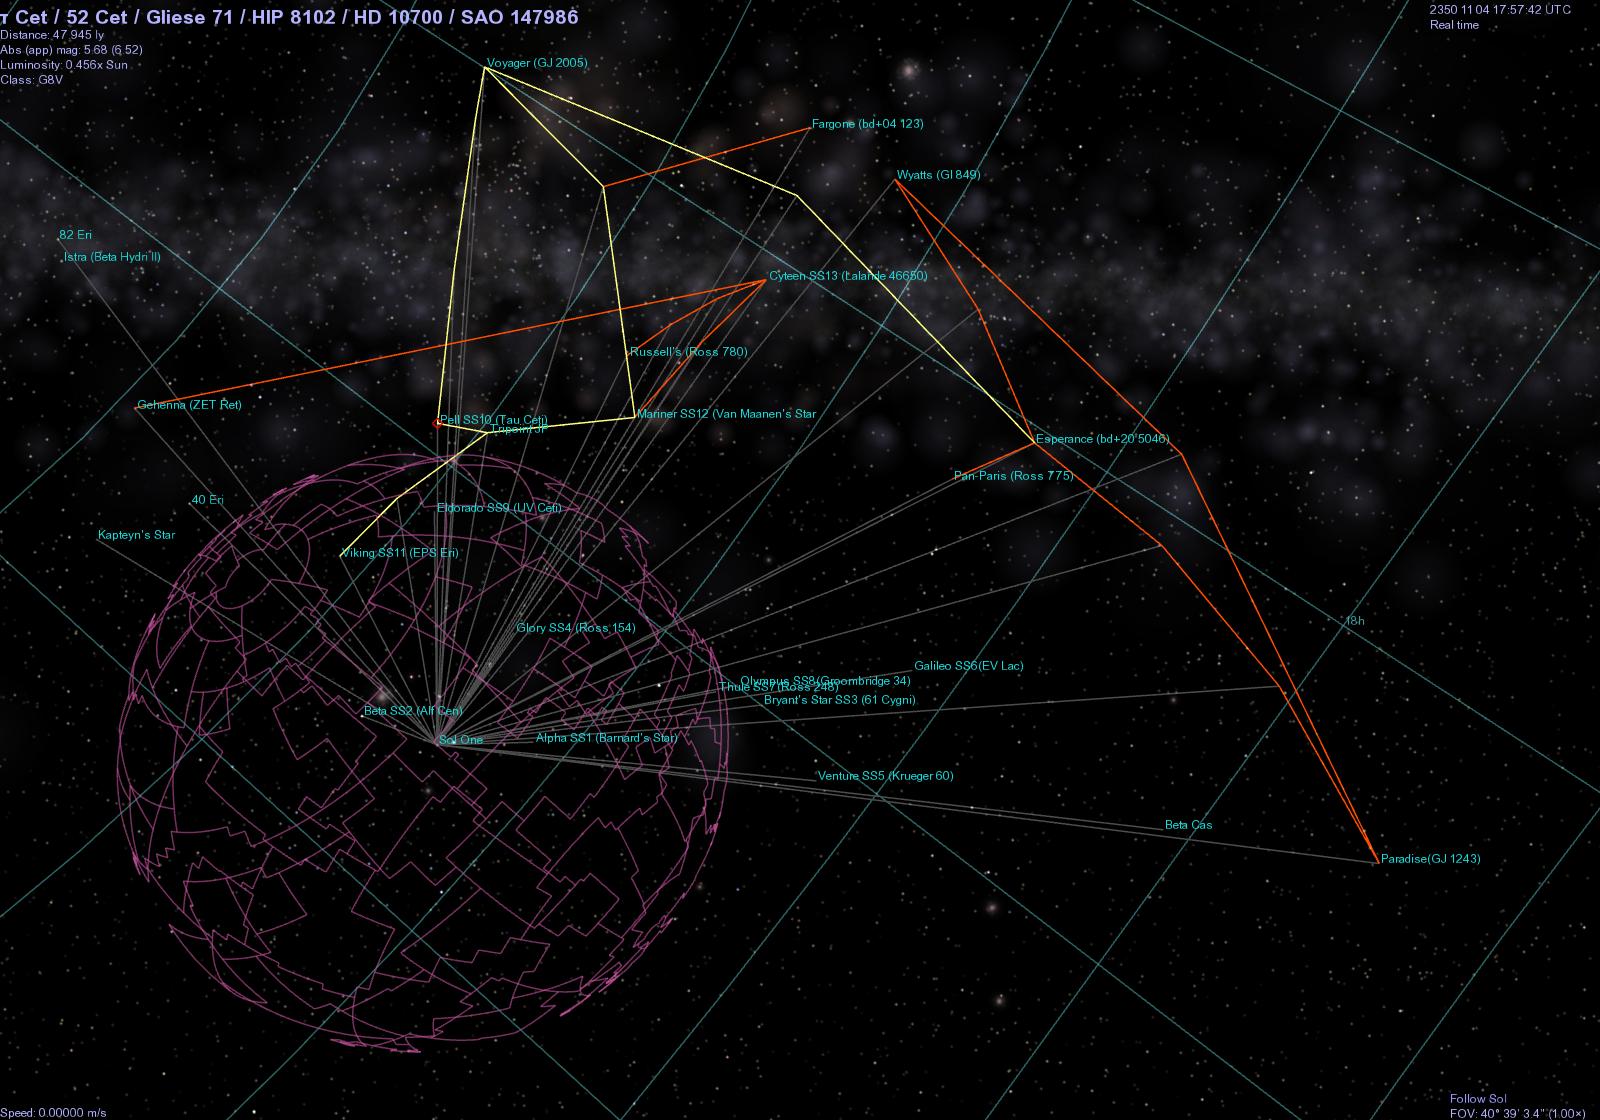
this map is exactly the one defined in my previous model (with some color variations).

As a small tutorial, here's how I find the proper ecliptic cartesian coordinates to build a CMOD file. First, I need the standard ecliptic coordinates of a star : RA (in degrees), Dec (in degrees) and Distance (in LY). The exact coordinates used by Celestia can be found in Celestia's database, in the file "stars.txt" (a large file available on CVS), or in the file "nearstars.stc". Then I apply the following formulae to get the cartesian coordinates :

Code: Select all

x = distance * sin(90?° - Dec) * cos(RA)

y = - distance * sin(90?° - Dec) * sin(RA)

z = - distance * cos(90?° - Dec)


The x, y, z numbers are then used in the ascii CMOD file. Here's the part of the CMOD which defines the mesh itself (you also need a material header, as in the example given in a previous post) :

Code: Select all

mesh
  vertexdesc position f3 end_vertexdesc

vertices  2
0   0   0
x   y   z

linelist 1  2
0 1

end_mesh


The vertices line defines the number of points declared in the list (2, in the example given above). The first point has coordinates 0, 0, 0, which is our Sun. The linelist command line defines the color to be used (color number 1, in the example above, which is a color defined in the material header), and the number of points to connect (2 in the example). The list itself (0 1 in the example above) defines a connection between point number 0 (our Sun) and point number 1 (of coordinates x, y, z).

Once the CMOD file is done, you need to define a DSC file, like the one I gave in a previous post. This is important to orient properly the model in Celestia, since there's a difference between the equatorial coordinates and the ecliptic coordinates :

Code: Select all

Nebula "Name"
{
   Mesh "model.cmod"
   Axis [ 1 0 0 ]
   Angle 66.5607089  # Important, since the equatorial grid has an inclination of 23.5?° (approx), relative to the ecliptic grid.
   Position [ 0 0 0 ]
   Radius 100  # Should be the same value used for the invisible mesh defined in the CMOD file, to center the model in Celestia.  See the example given in a previous post.
}


I hope this may help people to build their own CMOD file.
"Well! I've often seen a cat without a grin", thought Alice; "but a grin without a cat! It's the most curious thing I ever saw in all my life!"

Topic author
TutliQ
Posts: 8
Joined: 11.10.2007
With us: 16 years 7 months
Location: Ulan-Ude
Contact:

Post #17by TutliQ » 13.10.2007, 11:22

I made the lines using file "asterism.dat". The result looks rather good! It's exactly what I wanted. Thanks! :)

Reiko
Posts: 1119
Joined: 05.10.2006
Age: 40
With us: 17 years 7 months
Location: Out there...

Post #18by Reiko » 14.10.2007, 16:20

Cham wrote:
I hope this may help people to build their own CMOD file.


Thank you very much! :)

Reiko
Posts: 1119
Joined: 05.10.2006
Age: 40
With us: 17 years 7 months
Location: Out there...

Post #19by Reiko » 08.11.2007, 19:12

Cham wrote:material # 1
diffuse 0.4 0.2 1 # Asterism like blue
opacity 0.7
end_material

material # 2
diffuse 0.6 0.3 0.8 # Purple
opacity 0.5
end_material


I have a question, how do you get the color codes?

MKruer
Posts: 501
Joined: 18.09.2002
With us: 21 years 7 months

Post #20by MKruer » 08.11.2007, 20:10

Reiko wrote:
Cham wrote:material # 1
diffuse 0.4 0.2 1 # Asterism like blue
opacity 0.7
end_material

material # 2
diffuse 0.6 0.3 0.8 # Purple
opacity 0.5
end_material

I have a question, how do you get the color codes?


Color is based upon R G B factors, instead of being 0-255 that is ususaly used in other applications, it is 0.0 to 1.0.

So Take Red that is 255,0,0 becomes 255/255, 0/255, 0/255 or 1.0, 0 , 0


Return to “Celestia Users”